fbpx

EXPRESS SHIPPING WORLDWIDE - DIRECT FROM MANUFACTURER

gca logo new page

7 LINK FUNCTIONALITY

7.1 Description

Having detailed and independent control over each voice’s AMP ENVELOPE, ACCELERATION / BRAKE and FILTER parameters is one of the power features that really sets the MOTOR Synth apart from most instruments. However, there are situations when adjusting three sets of parameters individually can be inconvenient.

The LINK functionality solves this problem by allowing adjustments of AMP ENVELOPE, ACCELERATION / BRAKE and FILTER parameters of all three voices together with one set of controls. For example, instead of setting the AMP ENVELOPE for V1, then for V2 and finally for DCO, LINK allows users to choose which of the voices acts as master with the rest of the voices following the master controls.

7.2 List of parameters

The LINK functionality is accessible by pushing the ALT + DCO ENV / LINK button for AMP ENVELOPES, ALT + DCO ACC / LINK button for ACCELERATION / BRAKE and ALT + DCO FILTER / LINK button for FILTER. The related parameters are controlled with the LEFT & RIGHT SCREEN ENCODERS.

IN THIS SECTION

This list contains an overview of all parameters in this section. For further information refer to the Instructions sub-section. 

PARAMETERCONTROLDESCRIPTIONVALUE RANGE
Link Master [LINK MST]▷ LEFT SCREEN ENCODER The master voice selection for LINK functionality. The master voice controls will affect all other voices.“V1” MOTOR VOICE 1;
“V2” MOTOR VOICE 2;
“DCO” DIGITAL VOICE;
“OFFS” Offset (only available on FILTER LINK)
Unlink Type [UNLINK]◁ RIGHT SCREEN ENCODERBehavior when the LINK is disabled (Unlinked).‘’NO CHANGE” - All voices remain with the current parameter values, but are now individually controllable;
“TO SET VALS”’ - All voices return to their original values and are now individually controllable.
Link Master [LINK MST]
PARAMETER CONTROL DESCRIPTION VALUE RANGE

Link Master [LINK MST]

 LEFT SCREEN ENCODER

The master voice selection for LINK functionality. The master voice controls will affect all other voices.

“V1” MOTOR VOICE 1;
“V2” MOTOR VOICE 2;
“DCO” DIGITAL VOICE;
“OFFS” Offset (only available on FILTER LINK) 

Unlink Type [UNLINK]
PARAMETER CONTROL DESCRIPTION VALUE RANGE

Unlink Type [UNLINK]

 RIGHT SCREEN ENCODER

Behavior when the LINK is disabled (Unlinked).

‘’NO CHANGE” - All voices remain with the current parameter values, but are now individually controllable.

“TO SET VALS”’ - All voices return to their original values and are now individually controllable.

Each of the three LINK buttons opens a separate LINK screen: ENV LINK/UNLINK SCREEN, ACCEL LINK/UNLINK SCREEN and FILTER LINK/UNLINK SCREEN. The graph on the left side displays the state of the master voice and the graph on the right side shows the master/slave relationships.

7.3 Instructions

All instructions and screenshots below use the AMP ENVELOPE section as an example. They also apply to ACCELERATION / BRAKE and FILTER LINK functionality.

Push the ALT + DCO ENV / LINK button to enter the ENV LINK/UNLINK SCREEN.
Turn the   LEFT SCREEN ENCODER to choose the master voice “V1”, “V2” or “DCO”.

Push the  LEFT SCREEN ENCODER to confirm the LINK. This step will link all envelopes to the chosen master voice and open the AMP ENV SCREEN of the master voice. The Master “MST” voice controls will also control the Slave “SLV” parameters. The master voice is indicated by the Master “MST” label in the AMP ENV SCREEN, whereas the slave voices are indicated by the Slave “SLV” labels.

The Slave “SLV” voices’ original parameter values (before LINKING) are stored  in the instrument’s memory and are indicated by the dotted lines.  Those parameters that do not match with the Master’s “MST” are flashing. This allows to either UNLINK the envelopes and return to the previously set parameters or to switch to a different Master “MST” voice.

To change the Master “MST” voice repeat the LINK process: Push the ALT + DCO ENV / LINK button to enter the ENV LINK/UNLINK SCREEN. Turn the   LEFT SCREEN ENCODER to choose the master voice “V1”, “V2” or “DCO”. Push the  LEFT SCREEN ENCODER to confirm the LINK.

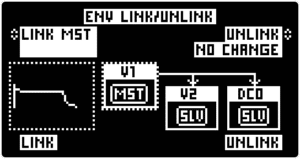
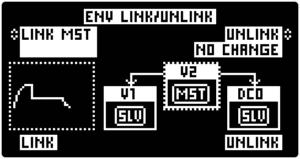
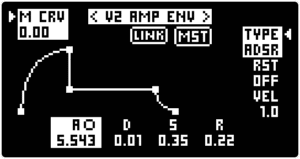
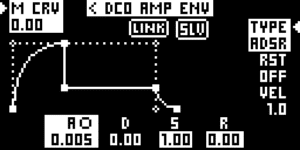
Tip: The AMP ENVELOPE of each voice can be used as a sort of an envelope shape preset, and the Master “MST” voice selection can be used to choose one of the 3 presets. For example, LINK all envelopes to the V1 as Master Voice “MST”. While linked, navigate to the V2 AMP ENV SCREEN. Change the V2 AMP ENVELOPE parameters. The parameter changes will not affect the sound, because it is in Slave “SLV” state, however, the dotted line envelope shape and flashing parameter readouts will match with the new settings. Now LINK all envelopes with V2 as Master “MST”. Now all envelopes will take over the V2 parameter values.

To exit the LINKED state and to regain individual control over all three AMP ENVELOPES push the ALT + DCO ENV / LINK button to enter the ENV LINK/UNLINK SCREEN. Turn the  RIGHT SCREEN ENCODER to toggle between two UNLINK modes: “NO CHANGE” or “TO SET VALS”.

UNLINKING with TO SET VALS” will snap the Slave “SLV” AMP ENVELOPES to their own settings indicated by the dotted line envelope shape and flashing parameter readouts. In most cases this will produce an immediate change in sound since all three ENVELOPES will return to their individual parameters.

UNLINKING with “NO CHANGE” will copy the Master’s “MST” parameter values over to the Slave “SLV” voices before UNLINKING. Slave “SLV” voices will lose their individual ENVELOPE parameter values. However, this allows for smooth transitions with no change in sound, as individual control over all three voices is regained.

The FILTER LINK functions the same as AMP ENVELOPE and ACCELERATION / BRAKE LINK apart from one difference – the possibility to offset individual filter parameter values while in LINK mode. This allows for simultaneous control over all FILTERS while maintaining the relative parameter value differences.

There are two ways to achieve a FILTER LINK OFFSET depending on the starting point and desired result.

The first way is introducing offsets when FILTERS are already linked. When in LINK mode double-push the V1 FILTER, V2 FILTER or DCO FILTER button to add parameter offsets to that FILTER. The selected FILTER button will start flashing together with an “OFFS” label in the FILTER SCREEN. Now use the FILTER controls to offset one of the following  desired parameters – [CUTOFF], [TYPE], [DRIVE] and [RESONANCE]. Exit the “OFFS” mode by pushing the selected V1/V2/DCO FILTER button again.
Now the Master “MST” voice will control all voices, but the offset parameters will maintain their relative differences.

Another LINK OFFSET feature offered in the FILTER Section is the LINK to OFFSET [OFFS] mode, which allows you to LINK all filter parameters to a single set of control knobs, while retaining their individual offset parameter relationships. For example, it is possible to set up three different [CUTOFF] frequencies for each FILTER while sweeping them at the same time with the CUTOFF knob. 

To LINK while maintaining each FILTER’s parameter values push the ALT + DCO ENV / LINK button to enter the ENV LINK/UNLINK SCREEN. Turn the  LEFT SCREEN ENCODER to set the [LINK MST] to “OFFS”. Push the  LEFT SCREEN ENCODER to confirm the LINK.

Curious?

Leave your email to receive news and subscriber-only deals!