fbpx

EXPRESS SHIPPING WORLDWIDE - DIRECT FROM MANUFACTURER

gca logo new page

13 SEQUENCER

13.1 Description

The MOTOR Synth features an internal monophonic step sequencer that can be used to create, edit and store melodies, basslines, songs.

The SEQUENCER PATTERN EDIT SCREEN has a similar workflow to the ARP RHYTHM section of the ARPEGGIATOR where the KEYPAD and PITCH ENCODERS are used for step editing. The main principles of selecting and editing steps are the same for the SEQUENCER PATTERN EDIT SCREEN and ARPEGGIATOR ARP RHYTHM SCREEN, however, the SEQUENCER offers more step editing options and in general puts greater focus on composition and precise pattern chaining.

In addition to the step editing possibilities introduced in the ARP RHYTHM section, such as velocity, ratchets and probability, the SEQUENCER PATTERN EDIT SCREEN lets you set up variable glide, gate length, microtiming and step repeat values for each step.

All sequences created within the built in engine are composed out of individual PATTERNS that each have a maximum number of 16 steps. There are 8 PATTERN slots in total, and the PATTERNS can be edited, copied, transposed and chained into QUEUES. There are four QUEUE slots labeled A, B, C, D and each QUEUE can store a chain of up to 12 PATTERNS (1-8). All PATTERNS and QUEUES can be stored on the MOTOR Synth’s SD Card as PROJECTS.

IN THIS SECTION

13.2 Instructions

13.2.1 Running the SEQUENCER

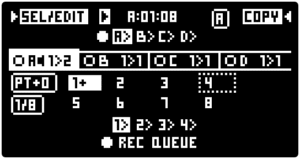
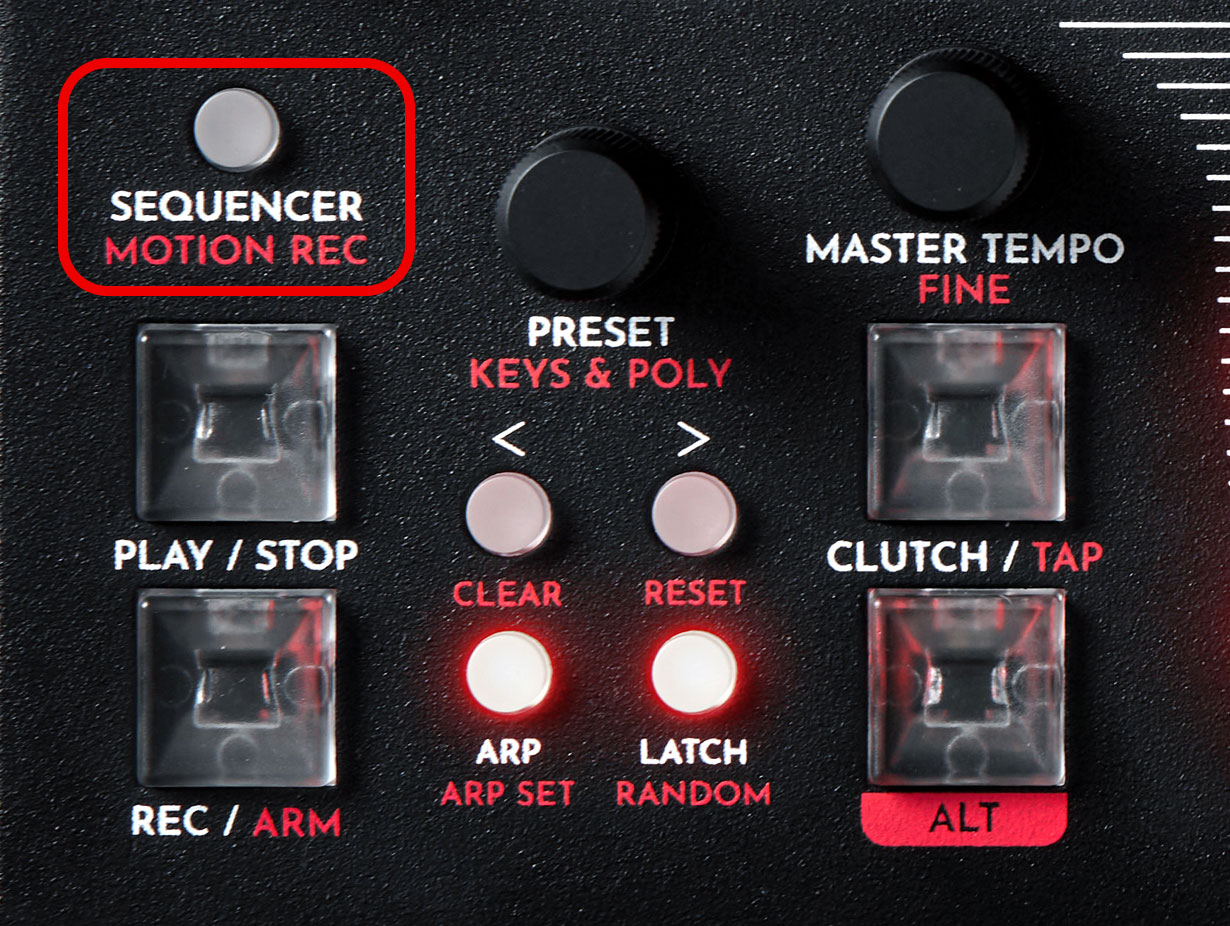
Enter the SEQUENCER by pressing the SEQUENCER button on the front panel. This opens the PATTERN SCREEN. Repeatedly pressing the button toggles between the PATTERN SCREEN and the QUE SCREEN (described in the sections below).

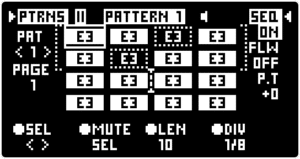
The PATTERN SCREEN gives you control over all steps of a single SEQUENCER PATTERN as well as a few general SEQUENCER settings.

Use the  RIGHT SCREEN ENCODER to toggle the SEQUENCER State [SEQ] between “ON” or “OFF”. When set to “ON” the SEQUENCER is activated, and will start running through the steps whenever the PLAY transport key is engaged (red). 

When set to “OFF” the SEQUENCER is deactivated, which means that it will not advance through the steps even if the PLAY transport key is engaged. 

The SEQUENCER State [SEQ] is a general parameter that applies to all PATTERNS within a PROJECT, and it is implemented in order to enable using the PLAY key for launching the MOTION RECORD engine without running the SEQUENCER, or vice versa.

Press PLAY/STOP again to stop the SEQUENCER.

To reset the SEQUENCE press ALT + PLAY. Pressing ALT + PLAY acts as a RESET for the SEQUENCER, ARPEGGIATOR and all MOTION RECORD lanes

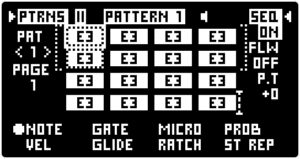
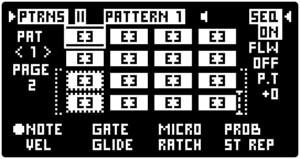
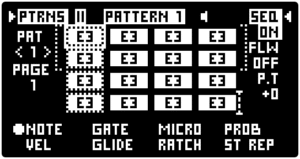
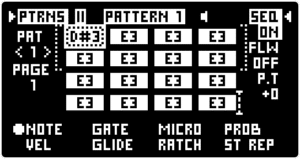
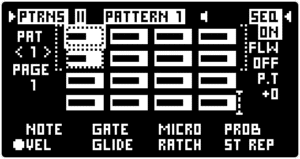
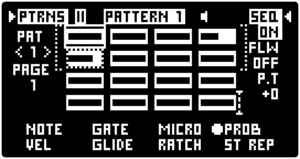
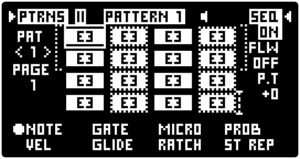
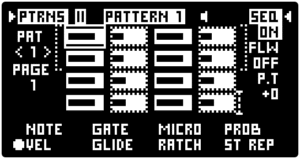
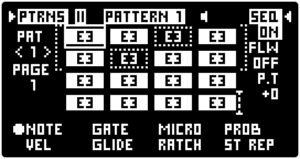
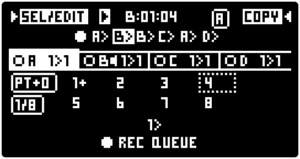
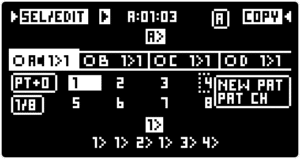
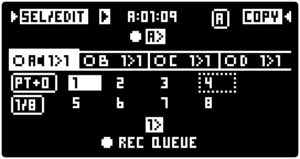
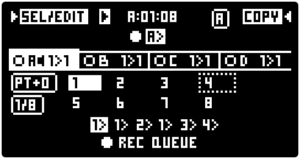
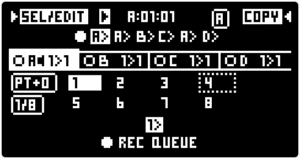
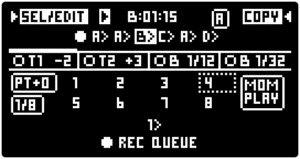
13.2.2 PATTERN SCREEN step selection

The PATTERN SCREEN gives control over all steps of a single SEQUENCER PATTERN. Step selection is identical to the ARP RHYTHM SCREEN step selection. While the PATTERN SCREEN  is open the KEYPAD functionality is changed. The KEYPAD does not activate and trigger notes – instead it is used to select individual PATTERN steps.

Each PATTERN contains a maximum of 16 steps that are grouped into 2 pages, each containing 8 steps. There is a special PAGE 1 and PAGE 2 label on the left side of the PATTERN EDIT screen, as well as an indication bracket that contains either STEPS 1-8 or STEPS 9 – 16. You can select and edit steps in each page by pressing the corresponding KEYS on the KEYPAD. When PAGE 1 is selected, KEYS 1- 8 correspond to steps 1- 8. Press one or multiple KEYS to select the corresponding PATTERN steps.
The selected step is indicated by the dotted line.

To select several steps together press multiple corresponding KEYS simultaneously. Each time a KEY is pressed or several KEYS are pressed simultaneously, the previously selected steps are deselected. In the example below KEYS 1 and 5 are pressed simultaneously to select steps 1 and 5.

To add more steps without deselecting previous steps hold ALT and press the KEYS one by one. 

To access steps 9 -16 turn the PRESET / KEYS & POLY encoder to the right until the PATTERN SCREEN indicates that the PAGE 2 is active and the cursor has moved to the 3rd and 4th row. Press KEYS 1- 8 to select steps 9 -16. In the example below KEYS 1 and 5 are pressed simultaneously to select steps 9 and 13.

To select steps in both PAGES, select the desired steps in one of the pages then turn the PRESET / KEYS & POLY encoder to go to the other page and hold ALT and press the KEYS to add steps to the selection.

Alternatively when making a new selection, you can press and hold one or more STEP KEYS in one PAGE, and turn the PRESET / KEYS & POLY encoder while the KEYS are still pressed down to select the same steps in the other PAGE. In the example below KEYS 1 and 5 are pressed to select steps 1 and 5. While the KEYS are held pressed down, the PRESET / KEYS & POLY encoder is turned to the right to activate PAGE 2 and automatically steps 9 and 13 are added to the selection. As a result all steps in the first column are selected.

To mute or unmute the selected steps press the PRESET / KEYS & POLY encoder.

To deselect steps, press any KEY twice.

13.2.3 PATTERN EDIT SCREEN step editing

While a single or several PATTERN steps are selected the PITCH ENCODERS are used to change step parameters instead of tuning the KEYPAD. Using the PATTERN EDIT SCREEN to change Step parameters is similar to the ARP RHYTHM step editing, but with several differences. The PITCH ENCODER parameters are indicated in the bottom part of the PATTERN SCREEN. The PITCH ENCODERS must be first pressed to activate them and then turned to change parameter values. Each encoder controls two parameters that can be  toggled by repeatedly pressing the encoder. An additional layer of PITCH ENCODER parameters is accessable when the ALT key is held down. Activating a PITCH ENCODER also turns on the corresponding parameter value readout for all steps.

PITCH ENCODER 1: [NOTE] & Velocity [VEL]

Click the PITCH ENCODER 1 to toggle between the [NOTE] and Velocity [VEL] parameters and turn the encoder to set each parameter for the selected steps.

[NOTE] sets the note value of the selected steps. The [NOTE] value adjustments can be unquantized, quantized to the chromatic scale or quantized to the scale of the KEYPAD. This is fully dependent on the [STEP] setting in the KEYPAD SETUP SCREEN . If multiple steps with different [NOTE] values are selected then adjusting the [NOTE] of these steps simultaneously raises or lowers the pitch of each step maintaining the pitch differences between the selected steps. In the example below the first step is selected and the [NOTE] value is adjusted without quantization.

The Velocity [VEL] value is indicated by a bar in each step. Setting the [VEL] to 0 effectively silences the step. In the example below steps 1 and 5 have Velocity [VEL] set to 0.5.

Note: The SEQUENCER Velocity [VEL] parameter functions in conjunction with the Velocity [VEL] parameters of AMP ENVELOPES, FILTER ENVELOPES and MODULATION ENVELOPES. If the ENVELOPE Velocity [VEL] parameter is set to 0, then the SEQUENCER Velocity [VEL] will produce no effect (except for silencing the step when set to 0). The ENVELOPE Velocity [VEL] functions as a response to the Velocity [VEL] of the SEQUENCER. If the ENVELOPE Velocity [VEL] is set to a negative value an inverse effect is achieved. For further information refer to the AMP ENVELOPE / Setting the ENVELOPE Velocity [VEL] section.

PITCH ENCODER 2: Gate Length [GATE] & [GLIDE]

Press the PITCH ENCODER 2 to toggle between the Gate Length [GATE] and [GLIDE] parameters and turn the encoder to set each parameter for the selected steps.

[GATE] determines the gate length of the note within one SEQUENCER step. The parameter values are indicated by horizontal bars in each step. Setting the [GATE] parameter of a step to the maximum value will tie that step to the next one. As a result all ENVELOPES of tied steps remain in their Sustain [S] stages and are not retriggered. In the first example below step 1 and 5 [GATE] is set short and in the second example the gates of the same steps are set to the maximum value tying them together with the gates of the following step.

[GLIDE] determines the amount of portamento applied to the selected step from the previous note. The parameter value is indicated by a horizontal bar in each step. The minimum value produces no portamento effect, whereas the maximum value will result in a long gliding effect between the two neighboring notes. . In cases where two neighboring notes are set to the  same [NOTE] value the portamento effect will not be heard. In the example below steps 1 and 5 have a moderate amount of [GLIDE] applied.

Note: The [GLIDE] parameter does not affect ACCELERATION / BRAKE functionality. As both modulate the pitch when a new note is triggered, the final result is a sum of both pitch modulations.

PITCH ENCODER 3: Microtiming [MICRO] & Ratchet [RATCH]

Press PITCH ENCODER 3 to toggle between the Microtiming [MICRO] and Ratchets [RATCH] parameters and turn the encoder to set each parameter for the selected steps.

The Microtiming [MICRO] parameter is used to offset step triggers in time, allowing you to trigger each step early or to delay the trigger. Microtiming [MICRO] value is indicated by a cursor on a timeline within each step. In the center position the step is triggered precisely on the grid. Turning the encoder counterclockwise moves the cursor to the left and triggers the step early, whereas turning the encoder clockwise moves the cursor to the right and delays the step trigger. This allows for nuanced microtiming of each step and escaping the precise rhythmic grid associated with step sequencers. The minimum and maximum [MICRO] settings move the note to trigger a half beat early or late, which triggers the step precisely on the upbeat. In the example below step 3 is triggered early and step 7 is delayed.

Ratchet [RATCH] count is indicated by a number in each step. In the example below step 8 [RATCH] set to 4 produces four evenly spaced note triggers within the step.

Note: All ratchets are evenly spaced within the time of one step. However, this is affected by the Microtiming [MICRO] parameter. If the [MICRO] parameter triggers a step early, the previous step’s time is shortened causing the ratchets of the previous step to trigger faster. Similarly, if the [MICRO] parameter delays a step the total length of that step is shortened resulting in ratchets being triggered faster than without Microtiming [MICRO].

PITCH ENCODER 4: Probability [PROB] & Step Repeat [ST REP]

Probability [PROB] determines the gate probability of the selected steps. The Probability [PROB] value is indicated by a bar in each step. Setting the [PROB] to 0 effectively produces a break each time the selected steps are active. In the example below step 4 has [PROB] set to the half-way position which triggers the step 50% of the time and step 5 [PROB] is reduced only slightly producing only occasional breaks on this step.

ALT + PITCH ENCODER 1: Automatic multiple step selection

Hold ALT and turn PITCH ENCODER 1 to utilize the automatic SEQUENCER PATTERN step selection. This function enables quick multiple step selection in useful groups. Turn the encoder to the right to select one of the following groups:

“ALL” all step selection
“C-1-3” 1st and 3rd column step selection
“C-2-4” 2nd and 4th column step selection
“R-1-3” 1st and 3rd row step selection
“R-2-4” 2nd and 4th row step selection

Once the steps are selected use the other PITCH ENCODERS to change the parameters of all selected steps.

To clear the selection release ALT momentarily, press and hold ALT again and turn the encoder to the left to select “CLEAR”.

In the example below “C-2-4” automatic step selection is used to select all up-beat steps to then use PITCH ENCODER 1 to reduce the Velocity [VEL] of these steps.

ALT + PITCH ENCODER 2: [MUTE]

Hold ALT and press the PITCH ENCODER 2 to toggle [MUTE] on and off for the selected steps. Step [MUTE] is indicated by blacked out steps. In the example below Steps 3 and 6 are mutes.

Alternatively the selected steps can be muted by pressing the PRESET encoder.

ALT + PITCH ENCODER 3: Pattern Length [LEN]

Hold ALT and turn PITCH ENCODER 3 to set the total Pattern Length [LEN] between 1 and 16. The [LEN] value is indicated by a cursor that moves to the end point of the pattern. In the example below [LEN] is set to 10 steps which is indicated by the cursor after step 10.

ALT + PITCH ENCODER 4: Time Division [DIV]

Hold ALT and turn the PITCH ENCODER 4 to set the SEQUENCER PATTERN step subdivision in relation to the MASTER TEMPO.

13.2.4 PATTERN SCREEN additional settings

There are a few general settings and options in the PATTERN SCREEN.

Click the  RIGHT SCREEN ENCODER to toggle between the parameters on the right side of the PATTERN SCREEN and turn the encoder to change the values.

[SEQ] turns the SEQUENCER “ON” and “OF” regardless of the PLAY key status. This is covered in the first instructions section Running the SEQUENCER.

[FLW] determines if the PATTERN SCREEN follows the currently playing PATTERN when several PATTERNS are chained in QUEUE and played back. The default value “OFF” keeps the PATTERN SCREEN on the PATTERN selected, regardless of the currently playing PATTERN. Setting [FLW] to “ON” will always display the PATTERN currently playing in the QUE. For more information about PATTERN chaining in QUEUES refer to the QUEUE SCREEN chaining PATTERNS and QUEUES section. The currently playing PATTERN is indicated by a loudspeaker icon on the right side of the PATTERN number in the top part of the screen.

[P.T] Pattern transpose allows to transpose whole PATTERN in semitones without changing the [NOTE] values of all steps. The transposition limits are one octave down and one octave below the [NOTE] values. In the example below [P.T] is set to +2 which means all notes are played 2 semitones higher.

The left side of the PATTERN screen gives control over the currently displayed PATTERN. [PAT] indicated the PATTERN number. Use the < / > arrow buttons to switch between 8 available PATTERNS. Changing the displayed PATTERN does not change the currently played PATTERN. For more information on how to change the currently playing PATTERN refer to the QUEUE SCREEN chaining PATTERNS and QUEUES section.

13.2.5 QUEUE SCREEN overview

Press the SEQUENCER button to toggle between the PATTERN SCREEN and the QUEUE SCREEN.  The QUEUE SCREEN gives you access to all 8 PATTERNS, copy/paste functionality, control over PATTERN chaining in QUEUES, changing QUEUES and saving 4 different QUEUES. This section provides an overview of the information provided in the QUEUE SCREEN and the next section provides detailed instructions for PATTERN and QUEUE CHAINING

There is a maximum of 8 PATTERNS per PROJECT (PATTERNS 1- 8) and a sequence or chain of patterns are called QUEUES. There are 4 QUEUE slots (QUEUES A, B, C, D) and the QUEUES themselves can also be chained.

The top line of the screen features the play status and play cursor readout in the center. The play status is indicated by the play and pause symbols. The play cursor readout follows the formula: [QUEUE] : [PATTERN] : [PATTERN STEP]. The example above “A:01:01” is read as “QUEUE A, PATTERN 1, STEP 1”.

The second line of the screen displays the current QUEUE chain. For example, “A>B>B>C>A>D”.

The third line of the screen provides a selection between the 4 QUEUE tabs as well as indicating the first two PATTERNS of each QUEUE. In this screen you can press the PITCH ENCODERS 1-4 to select QUES A, B, C and D accordingly and the  the currently selected QUEUE  will be indicated by a highlighted background. The loudspeaker symbol next to the QUEUE letter indicates  the currently playing QUEUE..

Lines four and five allow you to select and chain PATTERNS 1- 8 using the 8 corresponding KEYPAD KEYS. The selected PATTERN is indicated by a dotted line and the currently playing PATTERN is indicated by a highlighted background.

Below you can see the active PATTERN chain of the selected QUEUE. In the example above “1>1>2>1>3>3>4”.

The bottom line displays the text “REC QUEUE”, which is a placeholder for recording a new PATTERN chain for the QUEUE slot. The newly recorded PATTERN chain replaces the currently active PATTERN chain, once it begins playing back

13.2.6 QUEUE SCREEN managing PATTERNS

The QUEUE SCREEN can be used to navigate between different PATTERNS and to copy/paste PATTERNS.

Use the eight KEYPAD KEYS to select a corresponding PATTERN 1 – 8 for editing.The selected PATTERN is indicated by a dotted line. Now you can press the SEQUENCER button to enter the PATTERN EDIT SCREEN for the currently selected PATTERN in the QUE SCREEN

Alternatively you can navigate between PATTERNS in the QUE Screen using the  LEFT SCREEN ENCODER by “SEL/EDIT” on the top left corner of the screen. Pressing the LEFT SCREEN ENCODER opens the PATTERN EDIT SCREEN with the selected PATTERN. 

To copy/paste PATTERNS first select the source PATTERN to be copied by pressing a KEY 1-8 corresponding to the PATTERNS 1-8. Press the  RIGHT SCREEN ENCODER to copy the selected PATTERN indicated by “COPY” on the top right corner of the screen. Now select a target PATTERN  to paste to and press the  RIGHT SCREEN ENCODER again indicated by the “PASTE” label.

13.2.7 QUEUE SCREEN chaining PATTERNS

The QUE SCREEN is designed for launching different PATTERNS one by one, as well as for preparing and launching chains (QUEUES) of up to 12 PATTERNS. 

There are 3 modes of selecting and launching a PATTERN or a QUEUE of several PATTERNS:

Hold REC + KEYPAD = enter a PATTERN or a QUEUE of PATTERNS and play after the currently playing PATTERN.

Hold ALT + REC + KEYPAD = enter a PATTERN or a QUEUE of PATTERNS and play after the currently playing QUEUE.

Hold CLUTCH + REC + KEYPAD = enter a PATTERN or a QUEUE of PATTERNS and play at the next beat (instant switch).

While selecting a new PATTERN or a QUEUE of PATTERNS the corresponding PATTERN numbers appear instead of the “O REC QUEUE” label and the O symbol starts blinking. As soon as the REC key is released the newly selected PATTERNS are placed into the QUEUE. The start of the newly selected PATTERNS is determined by the choice of the above key combinations.

In the example below the SEQUENCER is playing a single PATTERN 1. Then a new chain of PATTERNS “1>1>2>1>3>4” is recorded and finally the recorded PATTERN chain starts playing back, as soon as the previous PATTERN has ended.

Now this newly created chain of PATTERNS will be continuously playing in a loop in QUEUE A. 

It is possible to change the mode of PATTERN selection during the process as long as the REC key is held pressed down. If a new chain of PATTERNS is entered, and the REC key is still held pressed down, pushing the ALT or CLUTCH keys will change when the selected PATTERNS will be played according to the 3 modes above.

Resetting the SEQUENCER with ALT + PLAY ends the currently playing PATTERN and QUEUE and starts playback of the new QUEUE.

13.2.8 QUEUE SCREEN chaining QUEUES

As can be seen in the example above, the recorded PATTERN chain is saved in the active QUEUE slot. There are four slots: QUEUES A, B, C and D. While the active PATTERN chain is playing you can access other QUEUES by pushing PITCH ENCODERS 1, 2, 3, 4 corresponding to QUEUES A, B, C, D. Selecting and viewing a QUEUE does not start playing the QUEUE.  QUEUES are selected and played similarly to PATTERNS. Up to 12 QUEUES can be chained. Hold REC + PITCH ENCODERS = enter a QUEUE or a chain of QUEUES and play after the currently playing PATTERN. Hold ALT + REC + PITCH ENCODERS = enter a QUEUE or a chain of QUEUES and play after the currently playing QUEUE. Hold CLUTCH + REC + PITCH ENCODERS = enter a QUEUE or a chain of QUEUES and play at the next beat (instant switch).
Currently active PATTERN chains in each QUEUE and the QUEUE chains are saved in a PROJECT. For more information refer to the corresponding section PRESETS and PROJECTS.  

13.2.9 QUEUE SCREEN momentary performance tools

The QUE SCREEN offers a few momentary performance tools for momentarily transposing the SEQUENCER and for momentarily looping the current PATTERN STEP. These momentary actions are performed by holding ALT and pushing the PITCH ENCODERS. During these actions the QUEUE SLOTS are replaced by the momentary action parameters.

Hold ALT and push the PITCH ENCODER 1 or 2 to transpose the SEQUENCER.

Hold ALT and turn the PITCH ENCODER 1 and 2  to set the transposition interval for each encoder individually between -12 and +12 semitones.

This way you can prepare two momentary pitch shift intervals and use them in a performance. 

Hold ALT and push the PITCH ENCODER 3 or 4 to continuously loop the current PATTERN STEP.

Hold ALT and turn the PITCH ENCODER 3 and 4 to set the looping subdivision for each encoder individually between 1/8 and 1/32.

Curious?

Leave your email to receive news and subscriber-only deals!