

MENU
The MASTER TEMPO (BPM) is used for triggering and synchronizing the rhythmic performance tools SEQUENCER and ARPEAGGIATOR as well as providing optional clock signal for the MODULATORS and MOTION RECORD. The MASTER TEMPO can be replaced with an incoming MIDI clock or it can be used as a master MIDI clock to synchronize external MIDI devices. The MASTER TEMPO is saved in PROJECTS rather than PRESETS. Please refer to the PRESETS and PROJECTS section for more information.
The MASTER TEMPO is controlled with the MASTER TEMPO encoder with additional MIDI clock parameters in the MASTER TEMPO SCREEN. To access the MASTER TEMPO SCREEN push the MASTER TEMPO encoder. Rest of the MIDI parameters are covered in the SETTINGS MENU and MIDI IMPLEMENTATION sections.
This list contains an overview of all parameters in this section. For further information refer to the Instructions sub-section.
| PARAMETER | CONTROL | DESCRIPTION | VALUE RANGE |
|---|---|---|---|
| Master tempo [MSTR BPM] | MASTER TEMPO encoder or tap ALT + CLUTCH / TAP at least 3 times. | Master tempo in BPM | From 20 to 420 |
| MIDI clock receive [MIDI RT IN] | ▷ LEFT SCREEN ENCODER | Determines if external MIDI clock is received | “ON” - Receiving
“FILT” - Not receiving |
| MIDI clock transmit [CLOCK] | ◁ RIGHT SCREEN ENCODER | Determines if the MASTER TEMPO is transmitted as MIDI clock. | “ON” - Transmitting
“FILT” - Not transmitting |
| MIDI clock transmit during STOP [WHEN STOP] | ◁ RIGHT SCREEN ENCODER | Determines if the MASTER TEMPO is transmitted as MIDI clock during STOP | “ON” - Transmitting
“OFF” - Not transmitting |
| START/STOP MIDI transmit [START/STOP] | ◁ RIGHT SCREEN ENCODER | Determines if the START & STOP MIDI messages are transmitted | “ON” - Transmitting
“FILT” - Not transmitting |
| PARAMETER | CONTROL | DESCRIPTION | VALUE RANGE | ||||
|---|---|---|---|---|---|---|---|
|
Master tempo [MSTR BPM] |
MASTER TEMPO encoder or |
Master tempo in BPM |
From 20 to 420 |
||||
| PARAMETER | CONTROL | DESCRIPTION | VALUE RANGE | ||||
|---|---|---|---|---|---|---|---|
|
MIDI clock receive [MIDI RT IN] |
▷ LEFT SCREEN ENCODER |
Determines if external MIDI clock is received |
“ON” – Receiving; |
||||
| PARAMETER | CONTROL | DESCRIPTION | VALUE RANGE | ||||
|---|---|---|---|---|---|---|---|
|
MIDI clock transmit [CLOCK] |
◁ RIGHT SCREEN ENCODER |
Determines if the MASTER TEMPO is transmitted as MIDI clock. |
“ON” – Transmitting; |
||||
| PARAMETER | CONTROL | DESCRIPTION | VALUE RANGE | ||||
|---|---|---|---|---|---|---|---|
|
MIDI clock transmit during STOP [WHEN STOP] |
◁ RIGHT SCREEN ENCODER |
Determines if the MASTER TEMPO is transmitted as MIDI clock during STOP |
“ON” – Transmitting; |
||||
| PARAMETER | CONTROL | DESCRIPTION | VALUE RANGE | ||||
|---|---|---|---|---|---|---|---|
|
START/STOP MIDI transmit [START/STOP] |
◁ RIGHT SCREEN ENCODER |
Determines if the START & STOP MIDI messages are transmitted |
“ON” – Transmitting; |
||||
There are two ways for setting the MASTER TEMPO (BPM).
First, by using the MASTER TEMPO. Push the encoder to open the MASTER TEMPO SCREEN and then turn the encoder to gradually adjust the BPM in increments of 1 BPM. For finer resolution hold ALT and turn the encoder t9 adjusts the BPM in decimal increments.

Second, by using tap tempo. Hold ALT and rhythmically tap CLUTCH / TAP at least 3 times to tap tempo.
Both BPM adjustment methods are designed to avoid accidental tempo changes.
The BPM is always displayed in the main PLAY SCREEN and it is used to trigger and synchronize the ARPEGGIATOR, SEQUENCER and optionally MOTION RECORD and MODULATION.
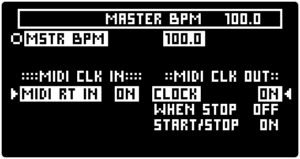
Push the MASTER TEMPO encoder to navigate to the MASTER TEMPO SCREEN and turn the ▷ LEFT SCREEN ENCODER to change MIDI clock receive settings (MIDI CLK IN). Set the [MIDI RT IN] to “ON” to receive the MIDI clock or set it to “OFF” to filter out the incoming MIDI clock.
Push the MASTER TEMPO encoder to navigate to the MASTER TEMPO SCREEN and use push the ◁ RIGHT SCREEN ENCODER to highlight one of the MIDI clock transit parameters (MIDI CLK OUT) and turn the encoder to change parameter values.
Set [CLOCK] to “ON” to transmit the MIDI clock.
[WHEN STOP] determines if the MIDI clock is transmitted while the MOTOR Synth is STOP mode with the SEQUENCER and MOTION RECORD. By default [WHEN STOP] is set to “OFF”. Change the value to “ON” to transmit the MIDI clock at all times if the [CLOCK] parameter is set to “ON”
[START/STOP] determines if the START & STOP MIDI messages are transmitted.
