
MENU
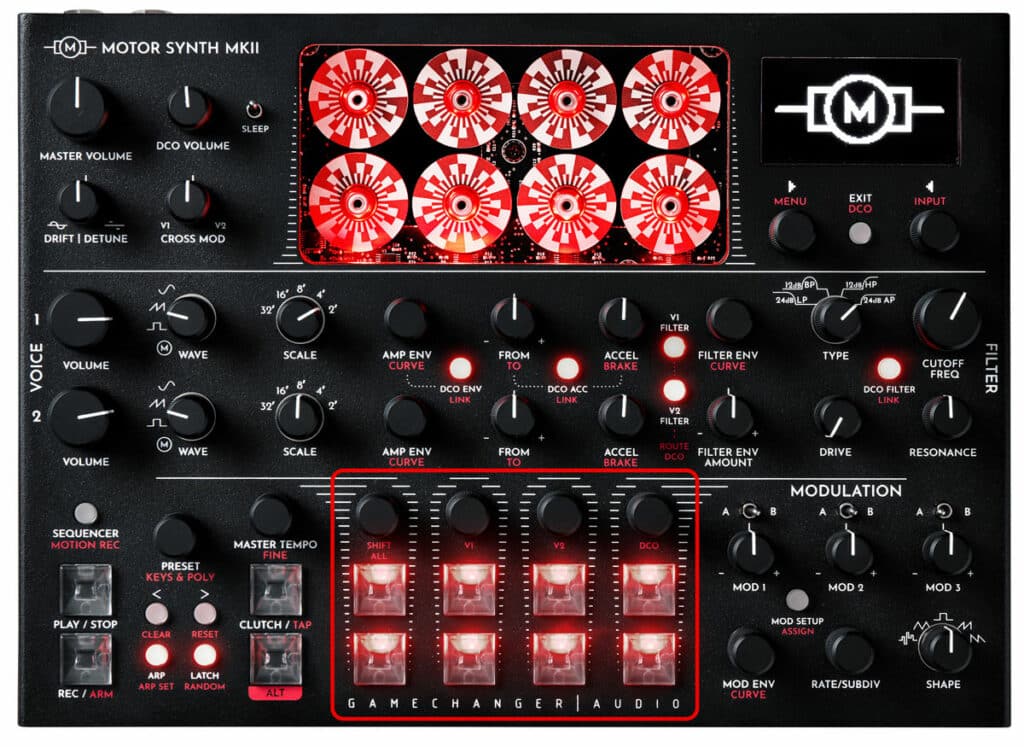
On the surface the MOTOR Synth’s KEYPAD might resemble a simplified version of a piano keyboard and it can in fact be used as one. However, combining the simple KEYPAD with numerous additional performance tools and parameters transforms it into a unique instrument capable of performances not typically possible on a piano keyboard.
Each KEY can be manually tuned to any musical note or frequency enabling both traditional western and microtonal scales. Alternatively, the whole KEYPAD can be instantly tuned with pre-programmed musical scales.
The PITCH ENCODERS can be used both for setting up the KEYPAD and for real time performances incorporating manual detuning and pitchwheel style bends. The LATCH key turns the KEYS into drones that can be tuned with the PITCH ENCODERS.
The KEYPAD is also an integral part of the SEQUENCER and ARPEGIATOR in which the KEYPAD changes its role from performance to programming. Furthermore, a short performance on the KEYPAD can be recorded, played back and looped using the MOTION RECORD. All of these are described in separate sections.
The MOTOR Synth’s performance interface is configurable for many different setups and performance styles. The configuration options include PITCH ENCODER detune limits, polyphony settings per VOICE, performance tool (KEYPAD, SEQUENCER, ARPEGIATOR, MIDI INPUT) assignment per VOICE and more. This configuration along with the KEYPAD tuning can be recalled with user PRESETS enabling instantaneous switching between different setups.
Finally, the MOTOR Synth introduces a unique permanence tool – the CLUTCH key. It toggles a temporary parameter editing buffer allowing silent parameter editing without disrupting the existing sound output. When the new parameter values are set the CLUTCH allows a sharp transition from the previous sound to the new one.

| PARAMETER | CONTROL | DESCRIPTION | VALUE RANGE |
|---|---|---|---|
| [KEY NOTE] | PITCH ENCODERS | The note value of each KEY | From E0 to B6 |
| [LATCH] | LATCH button | KEY latch toggle | “ON”; “OFF” |
| [OCTAVE SHIFT] | CLUTCH + </> arrow buttons | Octave shift of the KEYPAD | From 1 to 5 |
| [SHIFT ALL] | ALT + turn PITCH ENCODER 1 / SHIFT ALL | Note shift of the KEYPAD | From E0 to B6 |
| [V1 DETUNE]* | ALT + turn PITCH ENCODER 2 / V1 | MOTOR VOICE 1 detune | From -1200 cents to +1200 cents |
| [V2 DETUNE]* | ALT + turn PITCH ENCODER 3 / V2 | MOTOR VOICE 2 detune | From -1200 cents to +1200 cents |
| [DCO DETUNE]* | ALT + turn PITCH ENCODER 4 / DCO | DCO detune | From -1200 cents to +1200 cents |
| [ALL PITCHWHEEL]** | ALT + hold and turn PITCH ENCODER 1 / SHIFT ALL | Momentary detune of the KEYPAD | From -1200 cents to +1200 cents |
| [V1 PITCHWHEEL]** | ALT + hold and turn PITCH ENCODER 2 / V1 | Momentary detune of the MOTOR VOICE 1 | From -1200 cents to +1200 cents |
| [V2 PITCHWHEEL]** | ALT + hold and turn PITCH ENCODER 3 / V2 | Momentary detune of the MOTOR VOICE 2 | From 0 to 100From -1200 cents to +1200 cents |
| [DCO PITCHWHEEL]** | ALT + hold and turn PITCH ENCODER 4 / DCO | Momentary detune of the DCO | From -1200 cents to +1200 cents |
*These parameters are not related to DRIFT | DETUNE modulation effect. Please refer to the MODULATION EFFECTS section.
**These parameters are not related to MIDI pitchwheel control. Please refer to the MIDI IMPLEMENTATION section.
| PARAMETER | CONTROL | DESCRIPTION | VALUE RANGE |
|---|---|---|---|
| [KEY NOTE] | PITCH ENCODERS | The note value of each KEY | From E0 to B6 |
| [LATCH] | LATCH button | KEY latch toggle | “ON”; “OFF” |
| [OCTAVE SHIFT] | CLUTCH + | Octave shift of the KEYPAD | From 1 to 5 |
| [SHIFT ALL] | ALT + turn PITCH ENCODER 1 / SHIFT ALL | Note shift of the KEYPAD | From E0 to B6 |
| [V1 DETUNE]* | ALT + turn PITCH ENCODER 2 / V1 | MOTOR VOICE 1 detune | From -1200 cents to +1200 cents |
| [V2 DETUNE]* | ALT + turn PITCH ENCODER 3 / V2 | MOTOR VOICE 2 detune | From -1200 cents to +1200 cents |
| [DCO DETUNE]* | ALT + turn PITCH ENCODER 4 / DCO | DCO detune | From -1200 cents to +1200 cents |
| [ALL PITCHWHEEL]** | ALT + hold and turn PITCH ENCODER 1 / SHIFT ALL | Momentary detune of the KEYPAD | From -1200 cents to +1200 cents |
| [V1 PITCHWHEEL]** | ALT + hold and turn PITCH ENCODER 2 / V1 | Momentary detune of the MOTOR VOICE 1 | From -1200 cents to +1200 cents |
| [V2 PITCHWHEEL]** | ALT + hold and turn PITCH ENCODER 3 / V2 | Momentary detune of the MOTOR VOICE 2 | From 0 to 100From -1200 cents to +1200 cents |
| [DCO PITCHWHEEL]** | ALT + hold and turn PITCH ENCODER 4 / DCO | Momentary detune of the DCO | From -1200 cents to +1200 cents |
*These parameters are not related to DRIFT | DETUNE modulation effect. Please refer to the MODULATION EFFECTS section.
**These parameters are not related to MIDI pitchwheel control. Please refer to the MIDI IMPLEMENTATION section.
| PARAMETER | CONTROL | DESCRIPTION | VALUE RANGE | ||||
|---|---|---|---|---|---|---|---|
|
[KEY NOTE] |
PITCH ENCODERS |
The note value of each KEY |
From E0 to B6 |
||||
| PARAMETER | CONTROL | DESCRIPTION | VALUE RANGE | ||||
|---|---|---|---|---|---|---|---|
|
[LATCH] |
LATCH button |
KEY latch toggle |
“ON”; |
||||
| PARAMETER | CONTROL | DESCRIPTION | VALUE RANGE | ||||
|---|---|---|---|---|---|---|---|
|
[OCTAVE SHIFT] |
CLUTCH + < / > |
Octave shift of the KEYPAD |
From 1 to 5 |
||||
| PARAMETER | CONTROL | DESCRIPTION | VALUE RANGE | ||||
|---|---|---|---|---|---|---|---|
|
[SHIFT ALL] |
ALT + turn PITCH ENCODER 1 / SHIFT ALL |
Octave shift of the KEYPAD |
From 1 to 5 |
||||
| PARAMETER | CONTROL | DESCRIPTION | VALUE RANGE | ||||
|---|---|---|---|---|---|---|---|
|
[V1 DETUNE]* |
ALT + turn PITCH ENCODER 2 / V1 |
MOTOR VOICE 1 detune |
From -1200 cents to +1200 cents |
||||
| PARAMETER | CONTROL | DESCRIPTION | VALUE RANGE | ||||
|---|---|---|---|---|---|---|---|
|
[V2 DETUNE]* |
ALT + turn PITCH ENCODER 3 / V2 |
MOTOR VOICE 2 detune |
From -1200 cents to +1200 cents |
||||
| PARAMETER | CONTROL | DESCRIPTION | VALUE RANGE | ||||
|---|---|---|---|---|---|---|---|
|
[DCO DETUNE]* |
ALT + turn PITCH ENCODER 4 / DCO |
DCO detune |
From -1200 cents to +1200 cents |
||||
| PARAMETER | CONTROL | DESCRIPTION | VALUE RANGE | ||||
|---|---|---|---|---|---|---|---|
|
[ALL PITCHWHEEL]** |
ALT + hold and turn PITCH ENCODER 1 / SHIFT ALL |
Momentary detune of the KEYPAD |
From -1200 cents to +1200 cents |
||||
| PARAMETER | CONTROL | DESCRIPTION | VALUE RANGE | ||||
|---|---|---|---|---|---|---|---|
|
[V1 PITCHWHEEL]** |
ALT + hold and turn PITCH ENCODER 2 / V1 |
Momentary detune of the MOTOR VOICE 1 |
From -1200 cents to +1200 cents |
||||
| PARAMETER | CONTROL | DESCRIPTION | VALUE RANGE | ||||
|---|---|---|---|---|---|---|---|
|
[V2 PITCHWHEEL]** |
ALT + hold and turn PITCH ENCODER 3 / V2 |
Momentary detune of the MOTOR VOICE 2 |
From -1200 cents to +1200 cents |
||||
| PARAMETER | CONTROL | DESCRIPTION | VALUE RANGE | ||||
|---|---|---|---|---|---|---|---|
|
[DCO PITCHWHEEL]** |
ALT + hold and turn PITCH ENCODER 4 / DCO |
Momentary detune of the DCO |
From -1200 cents to +1200 cents |
||||
*These parameters are not related to DRIFT | DETUNE modulation effect. Please refer to the MODULATION EFFECTS section.
**These parameters are not related to MIDI pitchwheel control. Please refer to the MIDI IMPLEMENTATION section.
The KEYPAD SETUP SCREEN provides control over notes, scales, PITCH ENCODER quantization and Voice Detune [DETUNE]. Push ALT + PRESET / KEYS & POLY to access the KEYPAD SETUP SCREEN.
This list contains an overview of all parameters in this section. For further information refer to the Instructions sub-section.
| PARAMETER | CONTROL | DESCRIPTION | VALUE RANGE |
|---|---|---|---|
| [ROOT] | ▷ LEFT SCREEN ENCODER | The root note of the selected [SCALE] | From C to B |
| [SCALE] | ▷ LEFT SCREEN ENCODER | The scale of the assigned to the KEYPAD | “MAJOR”;
“MINOR”; “HARM MIN”; “BLUES PENT”; “MINOR PENT”; “MAJOR PENT”; “DORIAN”; “LYDIAN”; “MIXOLYDIAN”; “WHOLE TONE”; “BP 833” |
| [STEP] | ▷ LEFT SCREEN ENCODER | PITCH ENCODER control quantization | “MICRO” Microtonal, unquantized;
“CHROM” Quantized to chromatic scale; “SCALE” Quantized to the selected [SCALE] |
| [DETUNE MIN] | ▷ LEFT SCREEN ENCODER | The lowest possible interval for [V1, V2, DCO DETUNE] and [V1, V2, DCO PITCHWHEEL] parameters. | From -100 cents to -1200 cents |
| [DETUNE MAX] | ▷ LEFT SCREEN ENCODER | The highest possible interval for [V1, V2, DCO DETUNE] and [V1, V2, DCO PITCHWHEEL] parameters. | From 100 cents to 1200 cents |
| PARAMETER | CONTROL | DESCRIPTION | VALUE RANGE |
|---|---|---|---|
| [ROOT] | ▶ LEFT SCREEN ENCODER | The root note of the selected [SCALE] | From C to B |
| [SCALE] | ▶ LEFT SCREEN ENCODER | The scale of the assigned to the KEYPAD | “MAJOR”; “MINOR”; “HARM MIN”; “BLUES PENT”; “MINOR PENT”; “MAJOR PENT”; “DORIAN”; “LYDIAN”; “MIXOLYDIAN”; “WHOLE TONE”; “BP 833” |
| [STEP] | ▶ LEFT SCREEN ENCODER | PITCH ENCODER control quantization | “MICRO” Microtonal, unquantized; “CHROM” Quantized to chromatic scale; “SCALE” Quantized to the selected [SCALE] |
| [DETUNE MIN] | ▶ LEFT SCREEN ENCODER | The lowest possible interval for [V1, V2, DCO DETUNE] and [V1, V2, DCO PITCHWHEEL] parameters. | From -100 cents to -1200 cents |
| [DETUNE MAX] | ▶ LEFT SCREEN ENCODER | The highest possible interval for [V1, V2, DCO DETUNE] and [V1, V2, DCO PITCHWHEEL] parameters. | From 100 cents to 1200 cents |
| PARAMETER | CONTROL | DESCRIPTION | VALUE RANGE | ||||
|---|---|---|---|---|---|---|---|
|
[ROOT] |
▷ LEFT SCREEN ENCODER |
The root note of the selected [SCALE] |
From C to B |
||||
| PARAMETER | CONTROL | DESCRIPTION | VALUE RANGE | ||||
|---|---|---|---|---|---|---|---|
|
[SCALE] |
▷ LEFT SCREEN ENCODER |
The scale of the assigned to the KEYPAD |
“MAJOR”; |
||||
| PARAMETER | CONTROL | DESCRIPTION | VALUE RANGE | ||||
|---|---|---|---|---|---|---|---|
|
[STEP] |
▷ LEFT SCREEN ENCODER |
PITCH ENCODER control quantization |
“MICRO” Microtonal, unquantized; |
||||
| PARAMETER | CONTROL | DESCRIPTION | VALUE RANGE | ||||
|---|---|---|---|---|---|---|---|
|
[DETUNE MIN] |
▷ LEFT SCREEN ENCODER |
The lowest possible interval for [V1, V2, DCO DETUNE] and [V1, V2, DCO PITCHWHEEL] parameters. |
From -100 cents to -1200 cents |
||||
| PARAMETER | CONTROL | DESCRIPTION | VALUE RANGE | ||||
|---|---|---|---|---|---|---|---|
|
[DETUNE MAX] |
▷ LEFT SCREEN ENCODER |
The highest possible interval for [V1, V2, DCO DETUNE] and [V1, V2, DCO PITCHWHEEL] parameters. |
From 100 cents to 1200 cents |
||||
| PARAMETER | CONTROL | DESCRIPTION | VALUE RANGE |
|---|---|---|---|
| Release to stolen note [REL TO STOLEN] | ▷ LEFT SCREEN ENCODER | Release to stolen note, as polyphony slots free up | “ON”; “OFF” |
| [V1 POLY] | ◁ RIGHT SCREEN ENCODER | MOTOR VOICE 1 polyphony setup | “UNI” Monophonic;
“DUO” Duophonic; “POLY” Polyphonic |
| [V2 POLY] | ◁ RIGHT SCREEN ENCODER | MOTOR VOICE 2 polyphony setup | “UNI” Monophonic;
“DUO” Duophonic; “POLY” Polyphonic |
| [DCO POLY] | ◁ RIGHT SCREEN ENCODER | DCO polyphony setup | “UNI” Monophonic;
“DUO” Duophonic; “POLY” Polyphonic |
| PARAMETER | CONTROL | DESCRIPTION | VALUE RANGE |
|---|---|---|---|
| Release to stolen note [REL TO STOLEN] | ▶ LEFT SCREEN ENCODER | Release to stolen note, as polyphony slots free up | “ON”; “OFF” |
| [V1 POLY] | ◀ RIGHT SCREEN ENCODER | MOTOR VOICE 1 polyphony setup | “UNI” Monophonic;
“DUO” Duophonic; “POLY” Polyphonic |
| [V2 POLY] | ◀ RIGHT SCREEN ENCODER | MOTOR VOICE 2 polyphony setup | “UNI” Monophonic;
“DUO” Duophonic; “POLY” Polyphonic |
| [DCO POLY] | ◀ RIGHT SCREEN ENCODER | DCO polyphony setup | “UNI” Monophonic;
“DUO” Duophonic; “POLY” Polyphonic |
| PARAMETER | CONTROL | DESCRIPTION | VALUE RANGE | ||||
|---|---|---|---|---|---|---|---|
|
Release to stolen note [REL TO STOLEN] |
▷ LEFT SCREEN ENCODER |
“ON”; |
“OFF” / from 1 to 100 |
||||
| PARAMETER | CONTROL | DESCRIPTION | VALUE RANGE | ||||
|---|---|---|---|---|---|---|---|
|
[V1 POLY] |
◁ RIGHT SCREEN ENCODER |
MOTOR VOICE 1 polyphony setup |
“UNI” Monophonic; |
||||
| PARAMETER | CONTROL | DESCRIPTION | VALUE RANGE | ||||
|---|---|---|---|---|---|---|---|
|
[V2 POLY] |
◁ RIGHT SCREEN ENCODER |
MOTOR VOICE 2 polyphony setup |
“UNI” Monophonic; |
||||
| PARAMETER | CONTROL | DESCRIPTION | VALUE RANGE | ||||
|---|---|---|---|---|---|---|---|
|
[DCO POLY] |
◁ RIGHT SCREEN ENCODER |
DCO polyphony setup |
“UNI” Monophonic; |
||||
The NOTES TO VOICES SCREEN provides control over performance tool assignment to VOICES. Push ALT + PRESET / KEYS & POLY and then navigate right with the > arrow button to access the NOTES TO VOICES SCREEN.
This list contains an overview of all parameters in this section. For further information refer to the Instructions sub-section.
| PARAMETER | CONTROL | DESCRIPTION | VALUE RANGE |
|---|---|---|---|
| KEYPAD status per voice [KEYS] | ▷ LEFT SCREEN ENCODER | Individual KEYPAD status per VOICE | “ON”; “OFF” |
| MIDI channel per voice [MIDI] | ▷ LEFT SCREEN ENCODER | Individual MIDI channel setting per VOICE | MIDI channels 1-16; “ALL”; “OFF” |
| SEQUENCER status per voice [SEQ] | ▷ LEFT SCREEN ENCODER | Individual SEQUENCER status per VOICE | “ON”; “OFF” |
| ARPEGGIATOR status per voice [ARP] | ◁ RIGHT SCREEN ENCODER | Individual ARPEGGIATOR status per VOICE | “ON”; “OFF” |
| PARAMETER | CONTROL | DESCRIPTION | VALUE RANGE |
|---|---|---|---|
| KEYPAD status per voice [KEYS] | ▶ LEFT SCREEN ENCODER | Individual KEYPAD status per VOICE | “ON”; “OFF” |
| MIDI channel per voice [MIDI] | ▶ LEFT SCREEN ENCODER | Individual MIDI channel setting per VOICE | MIDI channels 1-16; “ALL”; “OFF” |
| SEQUENCER status per voice [SEQ] | ▶ LEFT SCREEN ENCODER | Individual SEQUENCER status per VOICE | “ON”; “OFF” |
| ARPEGGIATOR status per voice [ARP] | ◀ RIGHT SCREEN ENCODER | Individual ARPEGGIATOR status per VOICE | “ON”; “OFF” |
| PARAMETER | CONTROL | DESCRIPTION | VALUE RANGE | ||||
|---|---|---|---|---|---|---|---|
|
KEYPAD status per voice [KEYS] |
▷ LEFT SCREEN ENCODER |
Individual KEYPAD status per VOICE |
“ON”; |
||||
| PARAMETER | CONTROL | DESCRIPTION | VALUE RANGE | |||
|---|---|---|---|---|---|---|
|
MIDI channel per voice [MIDI] |
▷ LEFT SCREEN ENCODER |
Individual MIDI channel setting per VOICE |
MIDI channels 1-16 |
|||
| PARAMETER | CONTROL | DESCRIPTION | VALUE RANGE | ||||
|---|---|---|---|---|---|---|---|
|
SEQUENCER status per voice [SEQ] |
▷ LEFT SCREEN ENCODER |
Individual SEQUENCER status per VOICE |
“ON”; |
||||
| PARAMETER | CONTROL | DESCRIPTION | VALUE RANGE | ||||
|---|---|---|---|---|---|---|---|
|
ARPEGIATOR status per voice [ARP] |
◁ RIGHT SCREEN ENCODER |
Individual ARPEGGIATOR status per VOICE |
“ON”; |
||||
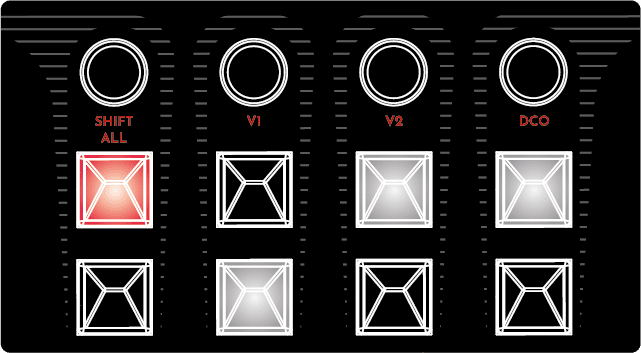
The keys on the KEYPAD are referred to as KEY 1 – 4 for row 1 and KEY 5 – 8 for row 2.
Each KEY can be in one of three states:
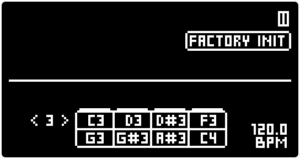
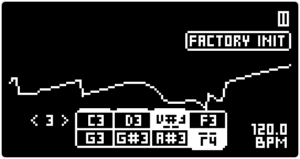
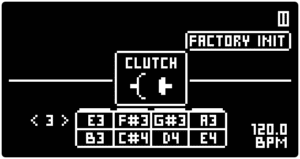
Note values of each KEY are indicated in the PLAY SCREEN. The screen is active after the MOTOR Synth is powered on. To return to the PLAY SCREEN from another screen, press the EXIT button. In the example below the KEYPAD is tuned to C minor scale and all of the KEYS are in OFF state.
As soon as any KEY is pressed it is illuminated red and the corresponding note is highlighted in the PLAY SCREEN. The oscilloscope monitors the output waveform.
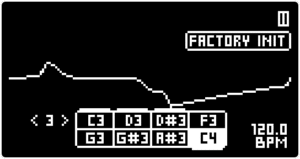
The PLAY SCREEN doubles as an information display for MASTER TEMPO, SEQUENCER and ARPEGGIATOR states, current PRESET name and other information. For more information refer to the corresponding sections.
The PITCH ENCODERS are referred to as PITCH ENCODER 1 – 4. Each PITCH ENCODER is used to tune the two KEYS in the column below the encoder. The PITCH ENCODERS can tune any KEY to any note or frequency including microtonal adjustments. The tuning process can be part of both KEYPAD setup and performance.

The PITCH ENCODER will tune KEY which was last played in the respective column. This KEY is indicated by a white marker line above or below the note value in the PLAY SCREEN.
In the example below in columns 1, 2, and 3 the top row KEYS are active (KEYS 1, 2, 3), and in column 4 the bottom row note is active (KEY 8). This means that turning the PITCH ENCODERS 1, 2, 3, will adjust the note values of KEYS 1, 2, 3, whereas turning PITCH ENCODER 4 will adjust the note value of KEY 8.
It is possible to assign the PITCH ENCODER to the other KEY which is not the last one played in the column. Hold CLUTCH and tap the inactive KEY. Release CLUTCH and use the PITCH ENCODER on the assigned KEY. In the example above, holding CLUTCH and tapping KEY 4 will only change the active KEY status for PITCH ENCODER 4 without triggering a new note on the KEYPAD. Release CLUTCH and turn the PITCH ENCODER to tune the selected KEY.
It is also possible to assign a PITCH ENCODER to both KEYS in a column. Hold ALT and press both KEYS in a column. Release ALT and use the PITCH ENCODER on both KEYS.
Push a PITCH ENCODER to restore the value of the KEY back to its preset value.
Tip: The possibility to push a PITCH ENCODER to restore preset KEY note value enables PITCH ENCODERS be used for detuning and pitch bends during a performance, as it is possible to instantly return back to preset value and carry on with the performance.
To OCTAVE SHIFT the whole KEYPAD hold CLUTCH and push the < / > for octave shifting down and up respectively. The OCTAVE SHIFT will occur as soon as the CLUTCH Button is released and the octave shift will also affect the currently played notes. This allows for octave shift spanning several octaves without audibly going through each octave. Furthermore, the OCTAVE SHIFT is affected by the ACCELERATION settings. So it is possible to perform gliding octave shifts. These functions distinguish the OCTAVE SHIFT from [SCALE] parameters. The selected octave is indicated by a number on the left from the KEY note values in the PLAY SCREEN.
The PITCH ENCODERS have several additional setup and performance functions via the ALT button.
KEYPAD SHIFT
ALT + turn PITCH ENCODER 1 / SHIFT ALL continuously shifts note values of the whole KEYPAD.
VOICE DETUNE
ALT + turn PITCH ENCODER 2 / 3 / 4 continuously detunes V1 / V2 / DCO respectively. The upper and lower detune intervals are determined in the KEYPAD SETUP SCREEN and the maximum available detune limit is +/- 1200 cents (one octave). This detune affects the whole voice when performed with other methods like MIDI keyboard, SEQUENCER, ARPEGGIATOR etc.
ALT + push PITCH ENCODERS resets the KEYPAD SHIFT and VOICE DETUNE.
PITCHWHEEL
ALT + hold and turn PITCH ENCODERS to produce an effect similar to the pitchwheel on keyboard instruments. A continuous but momentary detune control. After releasing the PITCH ENCODER the pitch of the whole KEYPAD or single VOICES will return back to starting position.
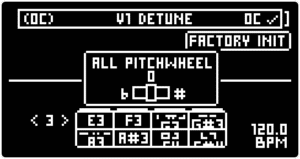
Note: The [DETUNE] and [PITCHWHEEL] parameters are measured in cents. 100 cents equal one musical semitone. For example, to detune a VOICE by a perfect fifth set the [DETUNE] to +700 cents.
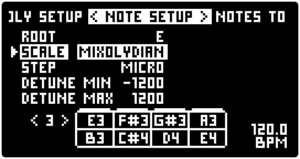
All parameters controlled with the ▷ LEFT SCREEN ENCODER.
[ROOT] determines the root note for the selected [SCALE]. All notes of the chromatic scale are possible.
[SCALE] is a selection of pre-programmed musical scales.
[STEP] determines the PITCH ENCODER pitch quantization for tuning the KEYS and KEYPAD SHIFT. “MICRO” Microtonal setting allows PITCH ENCODERS to gradually tune the KEYS without quantization, thus microtonal tunings are possible. “CHROM” Chromatic setting quantizes PITCH ENCODERS to the chromatic scale. “SCALE” setting quantizes PITCH ENCODERS to the selected [SCALE].
[DETUNE MIN] determines the lowest possible VOICE DETUNE and PITCHWHEEL interval. This allows to set up the PITCH ENCODERS for a specific performance where precise VOICE DETUNE is required.
[DETUNE MAX] determines the highest possible VOICE DETUNE and PITCHWHEEL interval.
By default the KEYPAD works similarly to other key instruments, the note gate length is determined by how long a key is held pressed. The LATCH button toggles the LATCH mode, on which the KEYS function as ON/OFF switches for the notes.
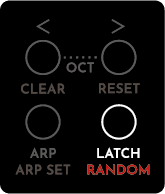
In the LATCH mode all notes activated on the MOTOR Synth’s KEYPAD will hold their ON state indefinitely (indicated by the red KEY illumination). Press the active KEY again to return to the OFF state. At this point the note will enter its respective AMP ENVELOPE Release [R] stage. The LATCH ode does not apply to notes that are triggered via MIDI or external controllers.
Tip: During the LATCH mode the KEYPAD can still be tuned using the PITCH ENCODERS. This is useful for creating drones, detuning layers and exploring beat frequencies especially with additional VOICE DETUNING and CROSS MODULATION.
Note: The polyphony slots need to be considered in the LATCH mode. If more than four KEYS are activated all polyphony slots are taken and note stealing will occur. Refer to POLY SETUP for more information.
Holding the ALT button allows to retrigger the envelopes of already active KEYS and play new momentary notes while keeping the already LATCHED notes ON.
The MOTOR Synth’s innovative CLUTCH key acts as a temporary parameter editing buffer for creating timed and sharp parameter transitions including note and pattern changes.
Press and hold the CLUTCH key to delay all real-time parameter changes made with KNOBS, ENCODERS and KEYS and apply all parameter changes made as soon as the CLUTCH KEY is released. This allows for parameter changes during a performance without the audible effect turning the knob. The CLUTCH key press and release are indicated by a temporary pop-up on the screen.
There is no limit to how many parameters can be changed while the CLUTCH key is held pressed, so the sound can be dramatically changed with several parameters at once with all changes taking place simultaneously and instantly as the CLUTCH key is released. Because there is no audible feedback of parameter changes while the CLUTCH key is held pressed, it requires developing muscle memory to fully utilize this feature with predictable outcome. Below are some musical tips.
Tip 1: Create a MUTE effect by holding the CLUTCH key pressed and rolling off the VOLUME knob of one ot VOICES. You will hear a sudden drop in volume only as the CLUTCH key is released instead of gradual decrease in volume.
Tip 2: Another obvious use-case would be to use the CLUTCH key to quickly open the FILTER [CUTOFF] during a “drop”.
Tip 3: Turn on the LATCH function and create a drone by activating a few KEYS. Press and hold the CLUTCH key and use ALT + PITCH ENCODER 1 to shift the KEYPAD note values, change the [SCALE] of MOTOR VOICE 1, and increase the FILTER [DRIVE]. Releasing the CLUTCH key will trigger all three parameter changes at once.
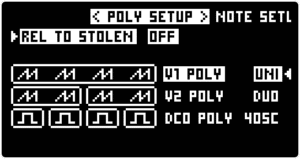
The polyphony settings are controlled with the ◁ RIGHT SCREEN ENCODER. Each voice has 3 possible [POLY] settings:
The MOTOR VOICE polyphony setting greatly influences the core sounds. As each motor has a slightly different output, consequently mixing two motors per note in the “DUO” setting or 4 motors in the “UNI” setting produces a more powerful output.
The number of motors per note also affects the nuances of AMP ENVELOPE, ACCELERATION & BRAKE, DRIFT and DETUNE functionality. For example, the DIRFT MODULATION EFFECT is applied to separate motors and digital oscillators. This remains the same regardless of the [POLY] parameter value. Mixing 4 individually modulated motors in the “UNI” mode will produce a chorusing effect even if only one note is played with one VOICE only.
When performing with the SEQUENCER and ARPEGGIATOR that are monophonic in nature the polyphony setting affects how overlapping AMP ENVELOPE Releases [R] function. In the “POLY” mode it is possible to trigger 4 steps in the SEQUENCER or ARPEGGIATOR with overlapping AMP ENVELOPE Releases [R] before AMP ENVELOPE RESET occurs. In the “UNI” mode it is impossible to overlap note Releases [R] as all motors with corresponding AMP ENVELOPES are taken up by a single step.
The note stealing setting [REL TO STOLEN] is controlled with the ▷ LEFT SCREEN ENCODER. This parameter determines how note stealing occurs as all polyphony slots are taken with active notes. In the “ON” setting the MOTOR Synth keeps the stolen note in buffer memory and as polyphony slots are free up, the stolen notes are retriggered. In the “OFF” setting, the stolen notes are not retriggered when polyphony slots free up.
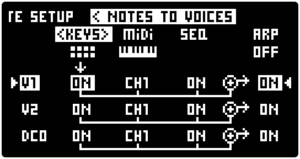
The ▷ LEFT SCREEN ENCODER controls the KEYPAD [KEYS], MIDI channel [IDI] and SEQUENCER [SEQ] assignment for each individual VOICE. Push the < / > buttons to navigate between the performance tools. Push the ▷ LEFT SCREEN ENCODER to navigate between individual VOICES and turn the same encoder to toggle between “ON” and “OFF” or to dial in the desired MIDI Channel.
The ◁ RIGHT SCREEN ENCODER controls the ARPEGGIATOR [ARP] assignment for each individual VOICE. Push the ◁ RIGHT SCREEN ENCODE to navigate between VOICES and turn the same encoder to toggle between “ON” and “OFF”
The following musical tips are only for the two MOTOR VOICES for the sake of simplicity. However, all of these and combinations of these can be applied to DCO as well. The possible performance setups can range from the the simple examples below to complex solutions aimed for very specific performance goals.
Tip 1 - Simultaneous arpeggios and chord pads: Setup the MOTOR VOICE 1 for synth pads with smooth AMP ENVELOPE Attack [A] and long Release [R]. Setup the MOTOR VOICE 2 for rhythmic playing with sharp AMP ENVELOPE Attack [A] and quick Release [R]. Navigate to the NOTES TO VOICES SCREEN and set the [ARP] to “OFF” for the MOTOR VOICE 1. When performing chords with the KEYPAD and the ARPEGGIATOR enabled, the V1 will hold all notes of the chord, while the V2 will arpeggiate through the chord notes.
Tip 2 - Simultaneous sequence and lead line: Setup the MOTOR VOICE 1 as bass sound and setup the MOTOR VOICE 2 as a lead sound. Navigate to the NOTES TO VOICES SCREEN. Set the [SEQ] to “OFF” for V1 and “ON” for V2. Set the [KEYS] to “ON” for V1 and “OFF” for V2. This allows the use of the SEQUENCER only for MOTOR VOICE 1 while the MOTOR VOICE 2 remains freely performable with he KEYPAD as a lead voice.
Tip 3 - Separate MIDI controllers for each VOICE: It possible to utilize a MIDI controller that can send note values via several MIDI channels or use several MIDI controlled through a MIDI merger to control each voice individually. One MIDI controller might be a traditional MIDI keyboard for lead line performance with MOTOR VOICE 1 and another MIDI controller might be a step sequencer for the MOTOR VOICE 2. To setup individual MIDI channels for each voice, navigate to NOTES TO VOICES SCREEN and setup the desired MIDI channels for each voice individually.

