USEFUL INFORMATION
CONTACT US
+1 202 657 4587
Gamechanger Audio
Tomsona str 33A
Riga, LV-1013
Latvia
2 min read
The MOTOR CONTROLS are comparable with the oscillator controls on other synthesizers. These are often the foundational parameters for building a patch.
The motors are controlled in 2 groups – Motor Voice 1 [V1] and Motor Voice 2 [V2]. Each voice is made up of 4 motors that can work in polyphony, duophony or monophony. LINKS UZ POLY SETUP NODALJU. The 4 motors of each voice are controlled with one set of controls and parameters.

The 4 motors of each voice are controlled with one set of controls and parameters.
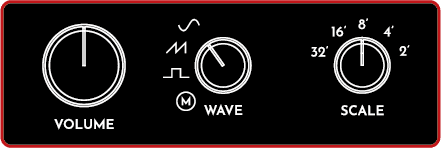
The motors are controlled with one rotary knob VOLUME and two rotary switches WAVE and SCALE for each motor voice. This list contains an overview of all parameters in this section. For further information refer to the Instructions sub-section.
| Parameter | Control | Description | Value range |
|---|---|---|---|
| VOLUME | VOLUME knob | The volume level of all motors of the given voice. | From 0 to 100 |
| WAVE | WAVE rotary switch | Waveshape output select | Sine Saw Square Electromagnetic inductive [M] |
| SCALE | SCALE rotary switch | Scale (octave) select | 32′ / 16′ / 8′ / 4′ / 2 ‘ |
| TONE MODE | ▶ LEFT SCREEN ENCODER | Advanced parameter. Tone tilt mode. | SCALE – the tone tilt follows the SCALE setting MANUAL – manual tone tilt control. |
| TONE | ◀ RIGHT SCREEN ENCODER | Advanced parameter. Tone tilt manual control. | From 0 (low boost / high cut) to 100 (low cut / high boost) |
Turn the VOLUME knob to adjust the output level of each voice – from zero (CCW) to the maximum level (CW).
This is the volume of each motor during the highest point of the AMP ENVELOPE. LINKS UZ AMP ENV NODALJU. In contrast to the MASTER VOLUME this parameter is saved in user presets and is an integral part of the patch. Whereas, the MASTER VOLUME is intended to be used as a utility control for setup with other gear.
Turn the WAVE rotary switch to select one of the four waveshapes available for each of the MOTOR Synth’s motor voices.
The first three waveshapes (SINE, SAW, SQUARE) are produced by an infra-red optocouple (emitter & sensor) that reads three separate graphical patterns imprinted on the MOTOR Synth’s reflective optical discs.
❕ Note: There are inherent imperfections in this system which result in less than precise readout of the graphical sine, saw and square patterns. This produces audio output which does not fully match what these waveforms usually sound like in typical analog oscillator systems. We see these imperfections as desirable because they provide unique source audio for further synthesis.
The fourth waveshape labeled as “M” is an electromagnetic inductive signal collected by special pickups placed next to each electromotor’s rotating coils.
🎵 Tip 1: The MAIN SCREEN provides an oscilloscope for the final output waveform. To monitor the waveform of a single motor play one note, turn the volume of other voices to 0 and set the FILTER to ALL PASS with the DRIVE and RESONANCE knobs set to minimum.
🎵 Tip 2: As the MOTOR VOICES do not offer waveshaping before the FILTER due to the nature of the instrument it can be a good idea to set both MOTOR VOICES to the same SCALE and explore mixing different WAVESHAPES and AMP & PITCH ENVELOPES.
The SCALE switch lets you set the octave range in which the motors will play all notes. Notes can be entered with the MOTOR Synth’s performance KEYS, ARPEGIATOR, SEQUENCER, various MIDI controllers, or triggered via the CV inputs.
There is an EQ tilt applied to the motor output signals before the are mixed and fed into the filter. In many patches the settings of the EQ tilt can be left to the default values, in which there is a gradual low boost / high cut in lower SCALE settings and low cut / high boost in higher SCALE settings. However some sound design cases can benefit from finer control.To change the motor output TONE turn the VOLUME knob and notice the [TONE SETT ◀] pop-up on the the upper-right corner of the screen. During this pop-up press the ◀ RIGHT SCREEN ENCODER to enter the ANALOG TONE SCREEN.
+1 202 657 4587
Gamechanger Audio
Tomsona str 33A
Riga, LV-1013
Latvia